Check entry values and calculate rates


Check entry values and calculate rates
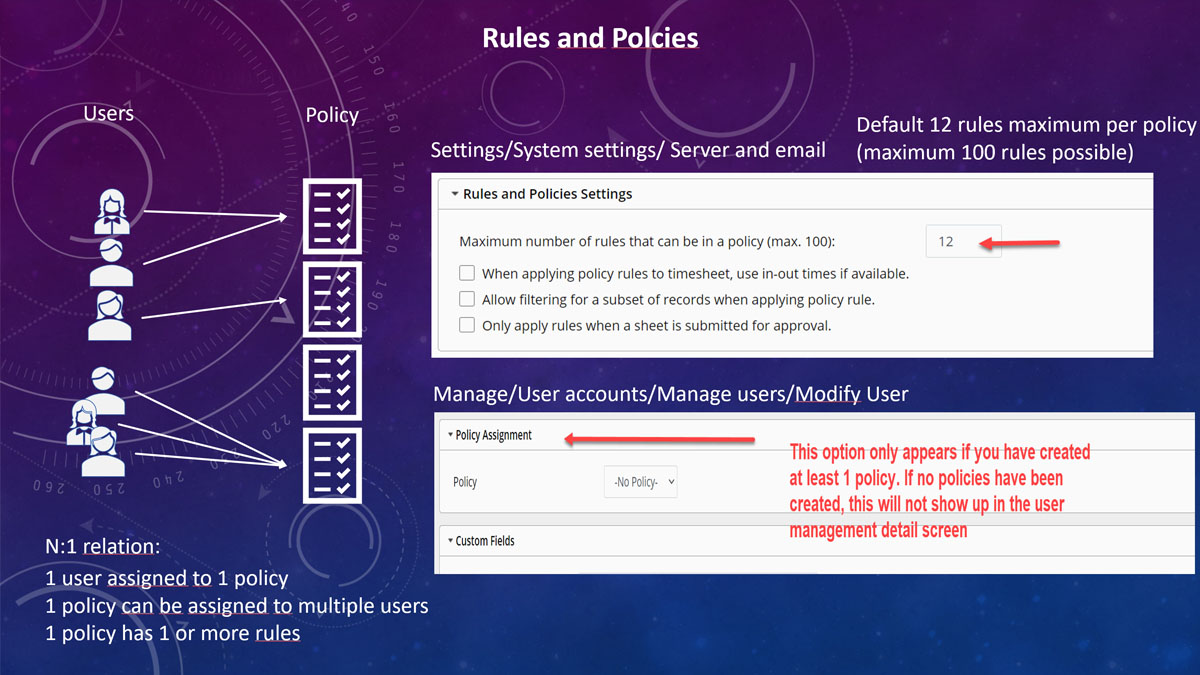
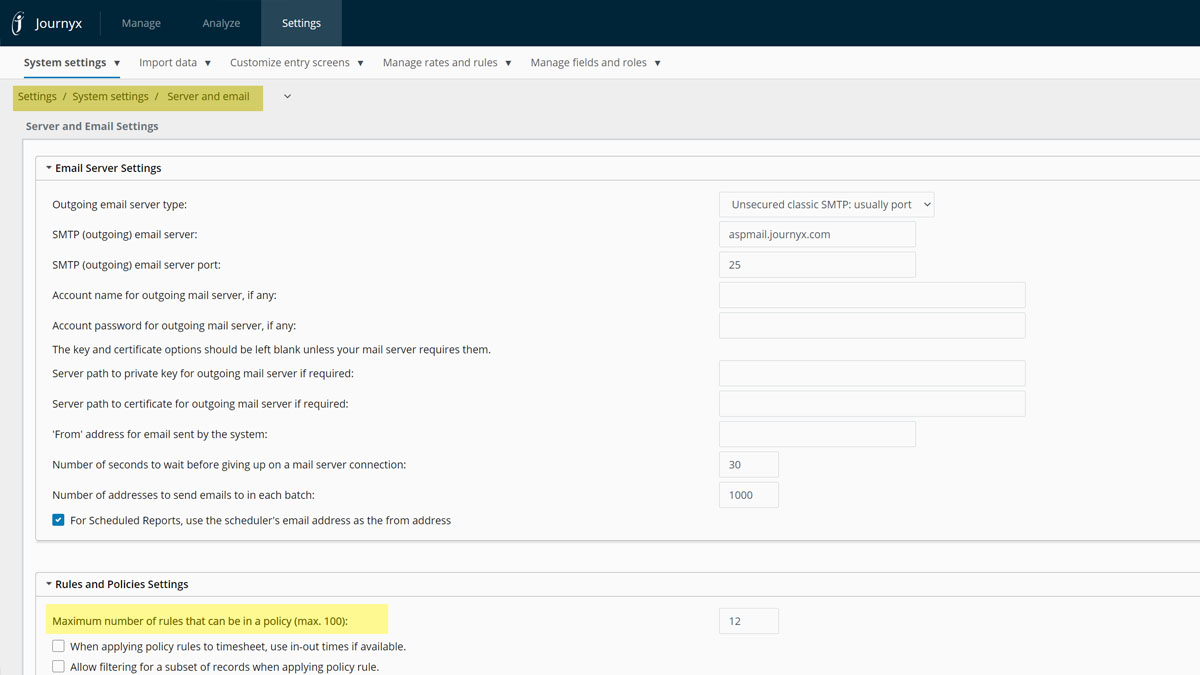
Policies and Rules management is located under Settings-->Manage rates and rules-->Manage rate rules and policies. Journyx provides a robust engine for creating and applying complex payroll and billing rules that can be applied to time tracked by users. Policies and Rules are at the very heart of the Rates & Rules Module of system. Administrators can create Rules that affect how time is handled for payroll or billing purposes. These Rules are then combined into a Policy, which can be assigned to users. Once a Policy has been assigned, each user's time and billing is processed appropriately according to the Rules within the Policy.
You can have the Journyx system do the following when a user clicks on the 'Submit your sheet' button:
Rate calculation and accrual calculations will take place when you either save or submit the timesheet. The calculated rates are stored with the time record and will remain unchanged until the sheet is saved again (forcing the system to recalculate the rates):
Rules regarding to policies
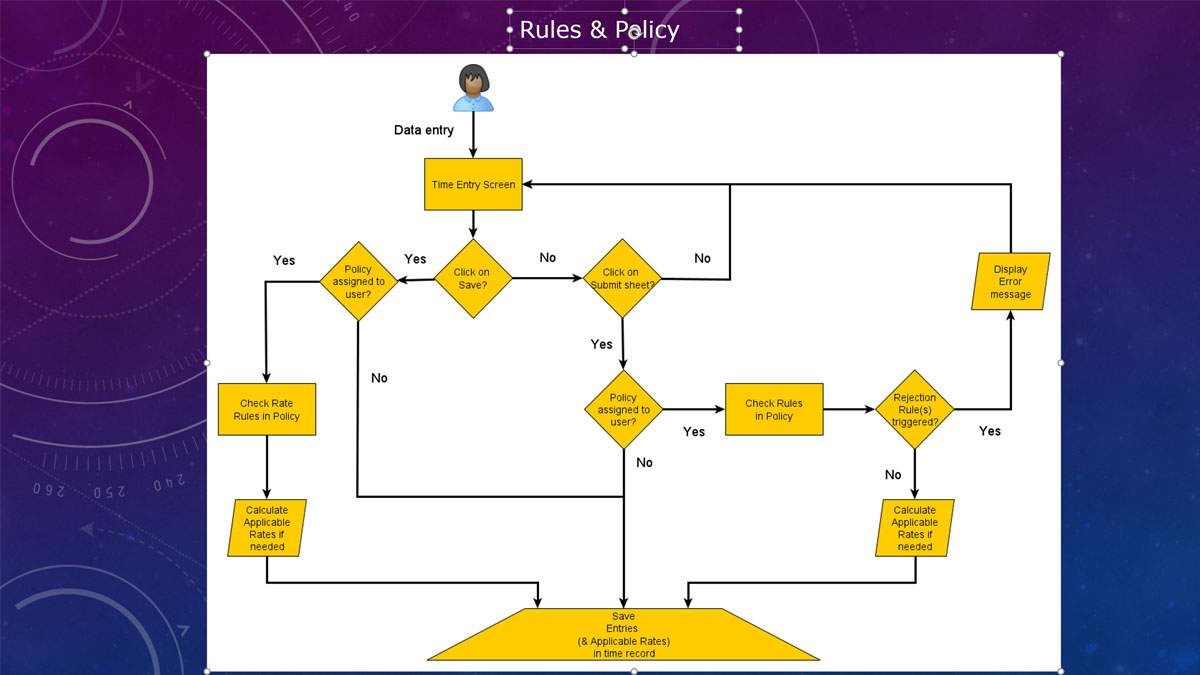
Proces when saving and submitting sheets
Rejection rules are triggered when a user submit the timesheet. If it is triggered then an error message is shown on the time entry screen. The sheet remains 'open' so the user can correct the error on the sheet and try submitting the sheet again. You can use rules to check whether the minimum amount of hours has been entered by the user (per day or per sheet). For example, you can set up a rule 'If timesheet contains less than 40 hours' reject the sheet and display the message 'Please enter at least 40 hours before submitting your sheet' (you can define the text of the message and you can determine the amount of hours that need to be entered).

Please enter at least 40 hours before submitting your sheet
There are a number of things that need to be set up:
Let's start with creating a new rule. A rule that checks if at least 40 hours are entered on the timesheet (remember you can create as many rules as you want with a different number of hours).
Go to Settings-->Manage rates and rules-->Manage rate rules and policies
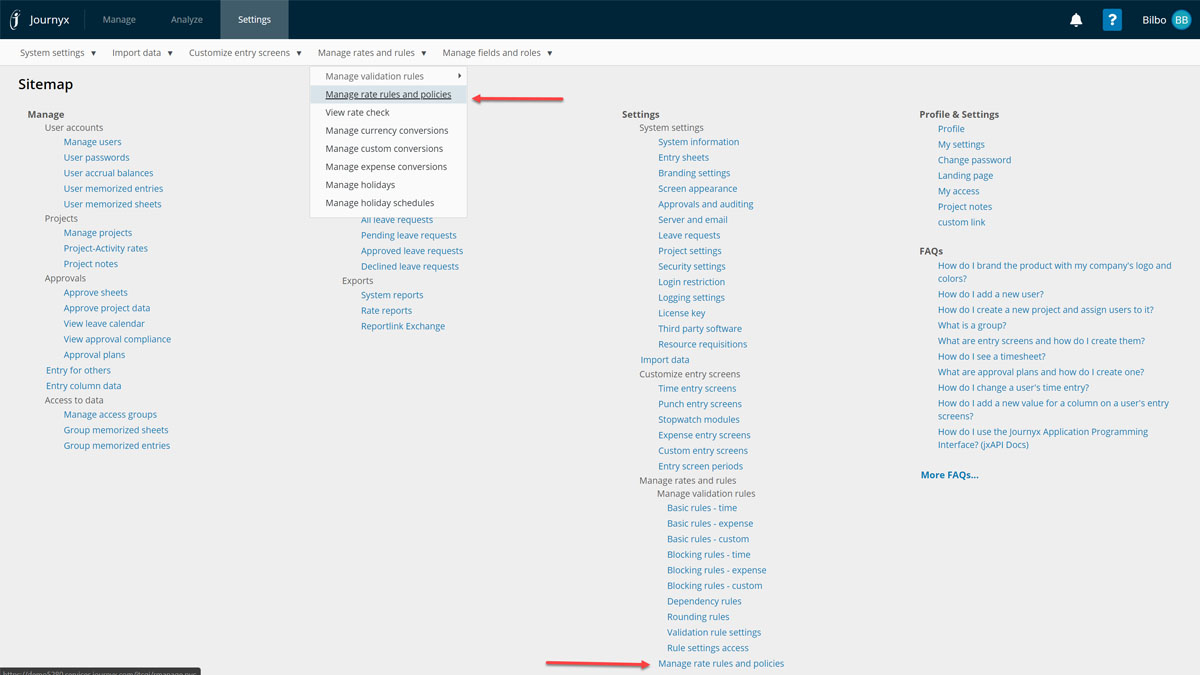
Manage rate rules and policies
Click on Create a rate rule
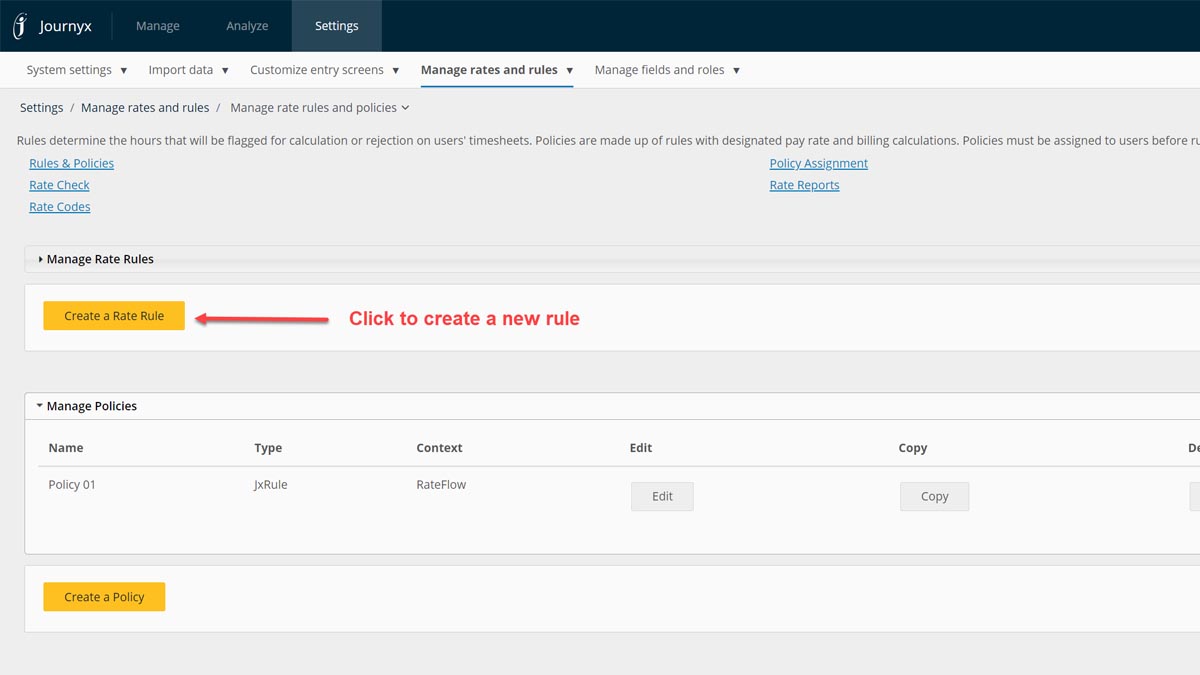
Create button
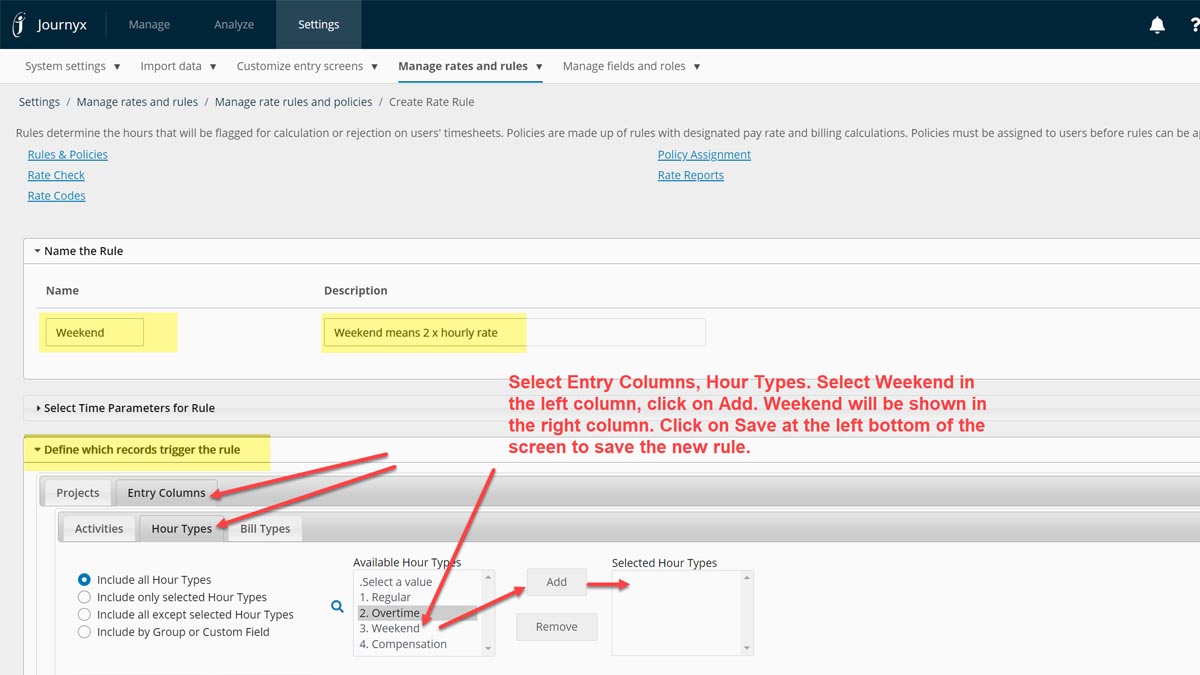
Give the new rule a meaningful name (rules and policies need to have a unique name).
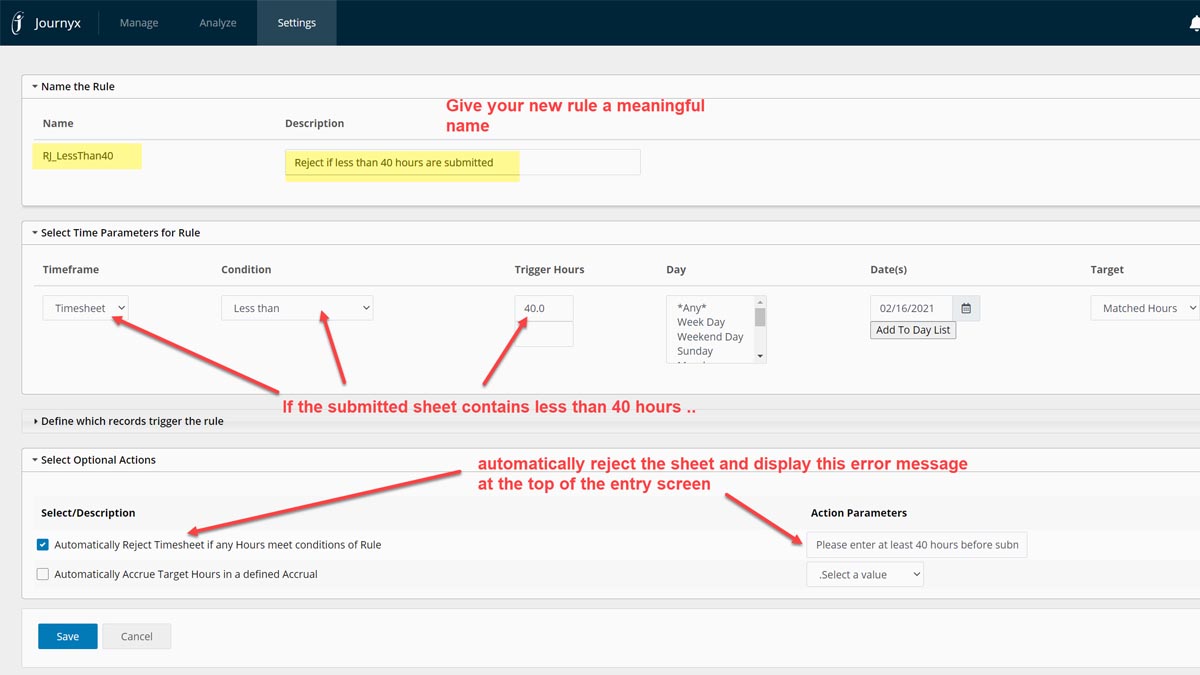
Specify what the rule needs to do
Once you have defined one or more rules you will need to put these rules into a policy (and assign the policy to the user or users for which the rules apply). Click on the 'Create a policy' button.
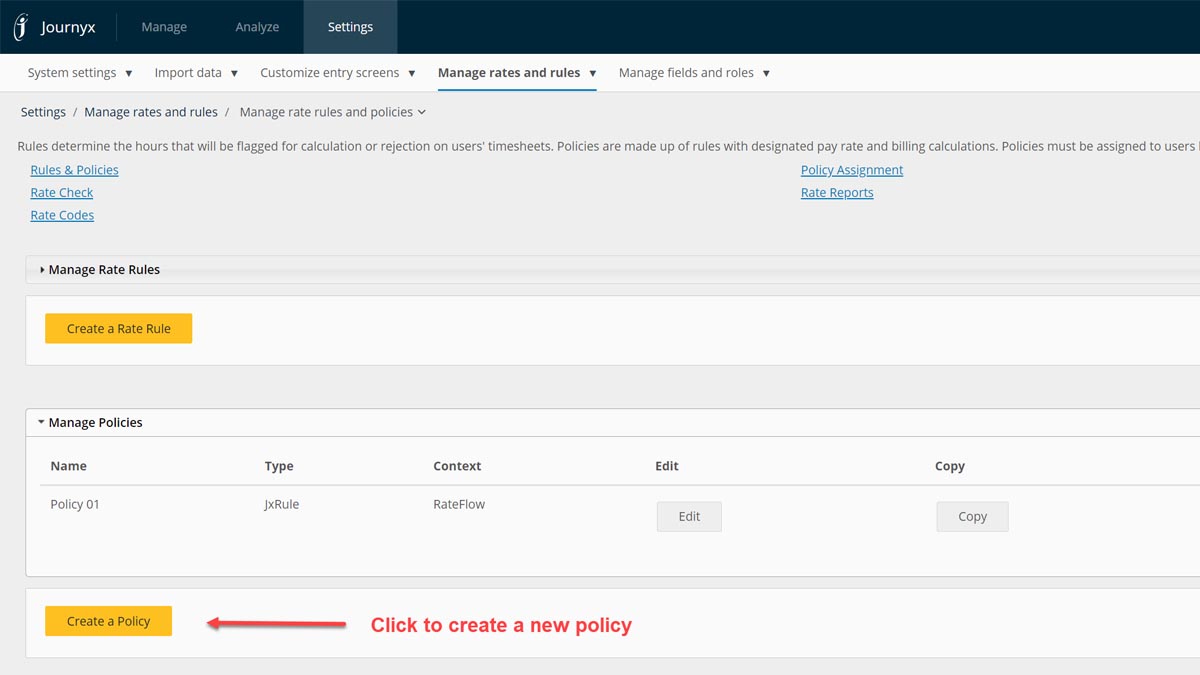
Create a policy button
How to name policies? If you're going to set up general rejection rules and general rates (for example for a group of people) then you would probably assign the policy to multiple users. For example, the rejection rule of a minimum of 40 hours and rejection on default values like 'Select a project' or 'Select an activity' would be placed in a policy named 'Policy_40hours' while a minimum of 32 hours rule would be placed in a 'Policy_32hours'. Or something like that.
If you are going to use rates and the hourly rate may differ per user, per project or per activity within a project then it would be more managable to give the policy the name of the user and only attach that user to the policy. This way you can change rates per user so that the changes do not effect other users.
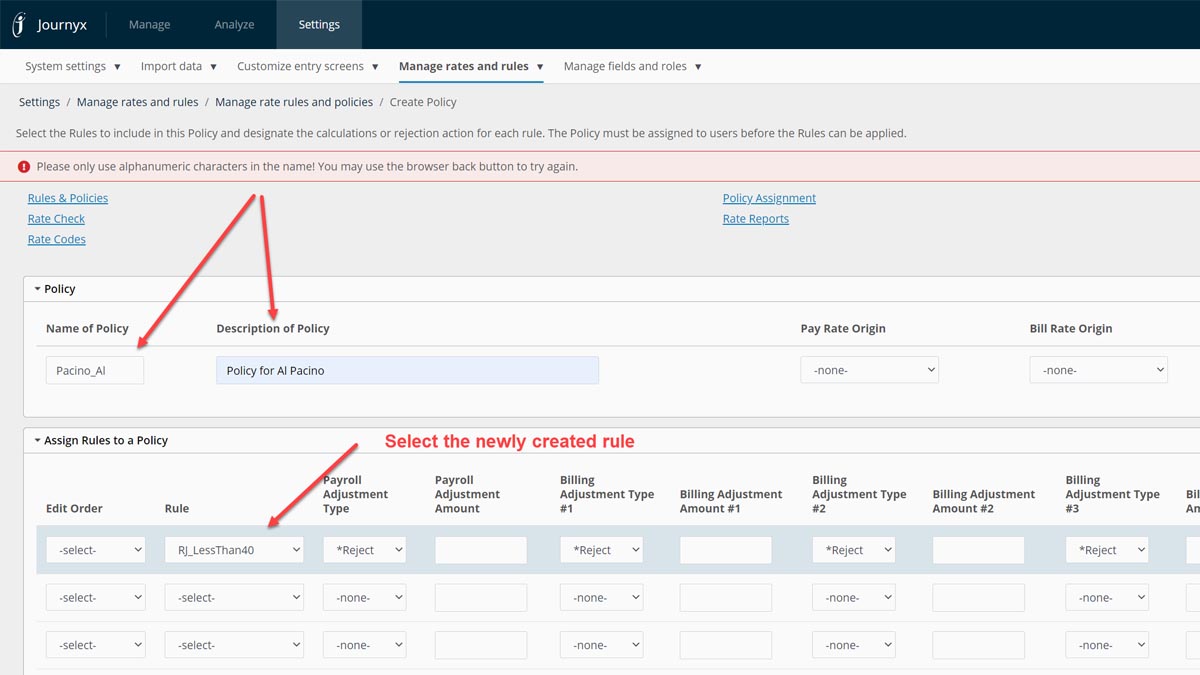
Add the rule to the policy
After adding the new rule to the new policy (don't forget to click on 'Save'), the only thing left to do is to assign the new policy to the user or users.
Click on the Policy Assignment link, Search for your user(s) and assign the policy.
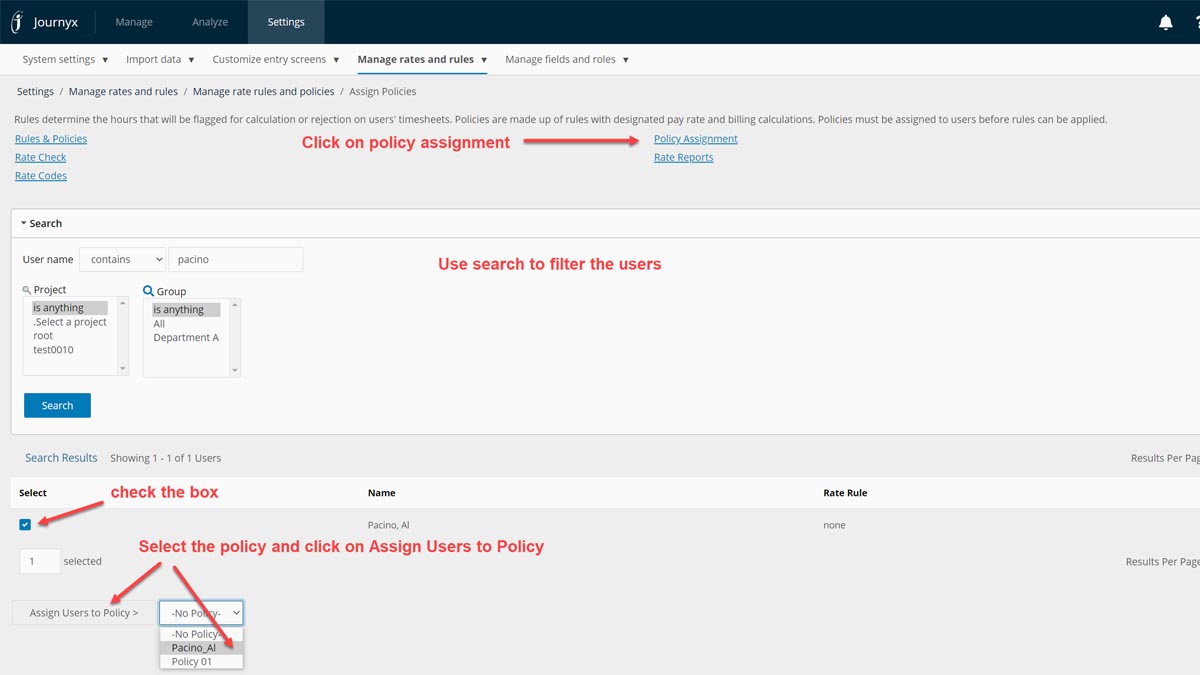
Assign the policy to a user
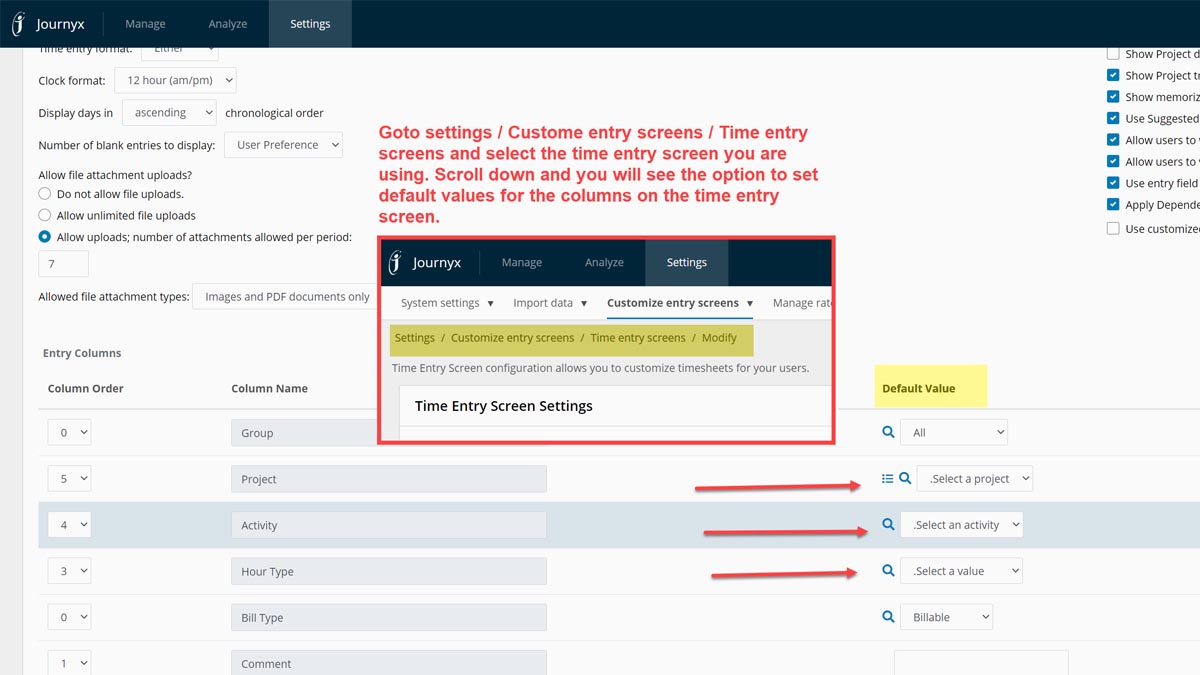
In this example we have defined default values for the 1st column Project (.Select a project), the 2nd column Activity (.Select an activity) and for the 3rd column Hour Type (.Select a value). The default values for the time entry screen can be set here.

Default values on the time entry screen.
By using default values you are making sure that the user actually selects the projects and the other column values. Naturally you want to make sure that no time is tracked on these default values so you create rejection rules that prevents just that: If time is tracked on '.Select a project' or '.Select an activity' or on '.Select a value' then display the appropriate error message. Remember, rejection rules are only triggered when a user submit his/her sheet. The above mentioned process steps are needed:
Let's start with the rule that checks if a user has entered time on the value '.Select a project' (this would mean that the user forgot to select an actual project on the time entry screen).

Defining the '.Select a project' rejection rule
The next rule is the rule that checks if a user has entered time on the '.Select an activity' default value.
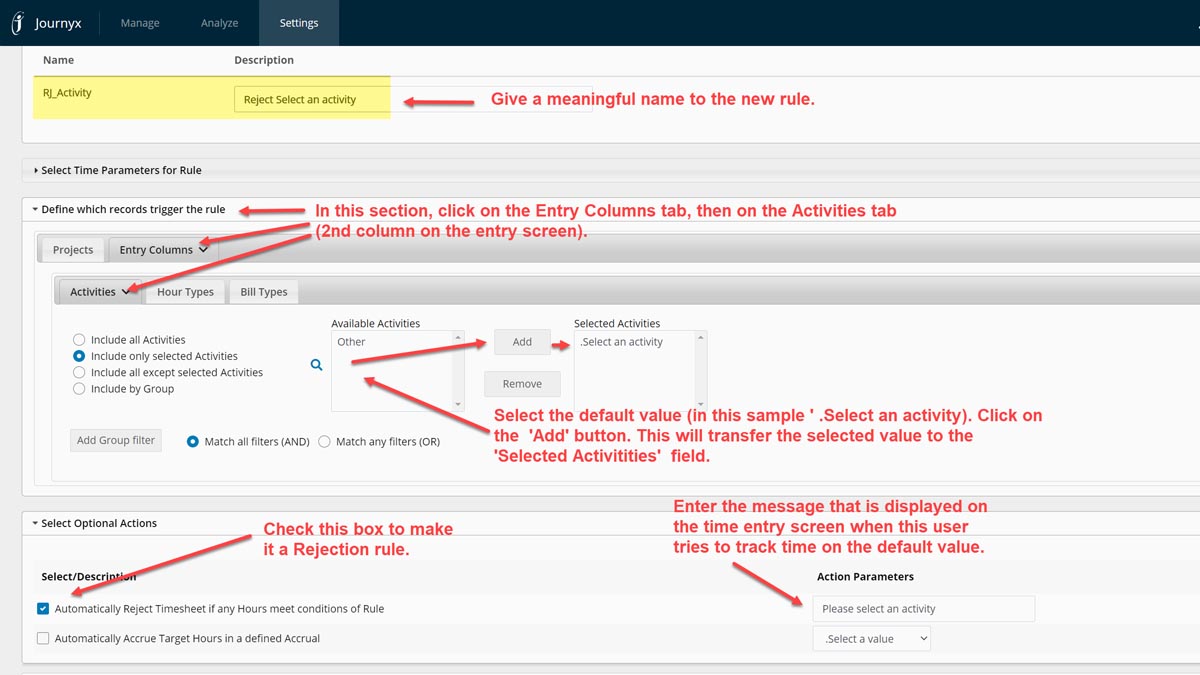
Defining the '.Select an activity' rejection rule
The final rule we define in our example is the rule that checks if a user has entered time on the default value '.Select a value' in the 3rd column on the time entry screen.
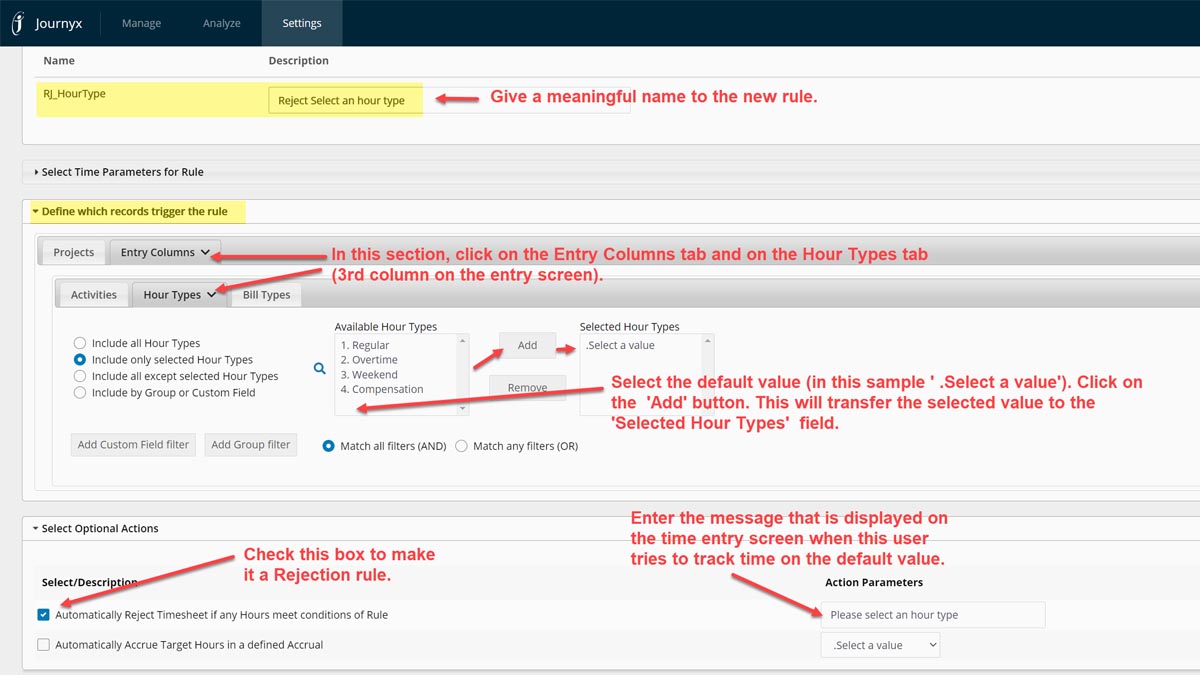
Defining the '.Select a value' rejection rule
All the rules we need are saved and ready to insert in a policy (make sure the policy is assigned to the user(s) that need it). Adding the rules to the policy is easy. Open an existing policy or create a new policy. Rules in a policy are handled top down. That means that the first rule is checked first, then the second and so on. You change the order of rules in a policy by moving them up or down the list of rules.
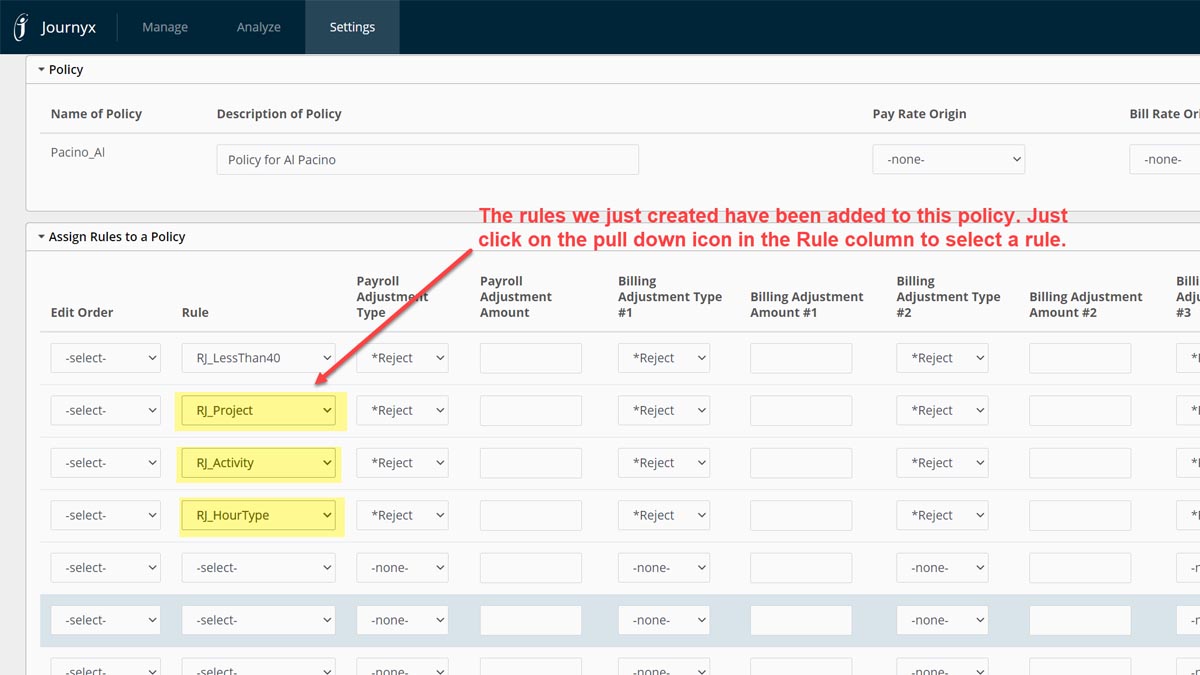
Add the new rules to the policy
There are a number of things that need to be set up before the system can calculate with hourly rates (number of rates * hourly rates = x amount).
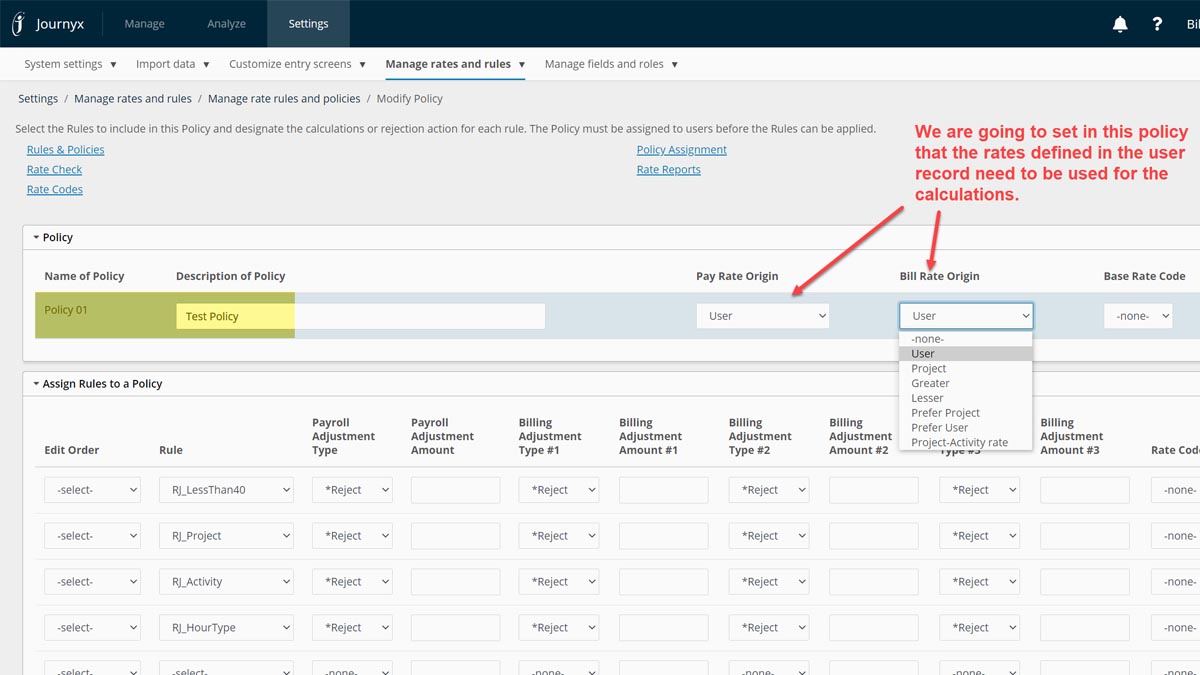
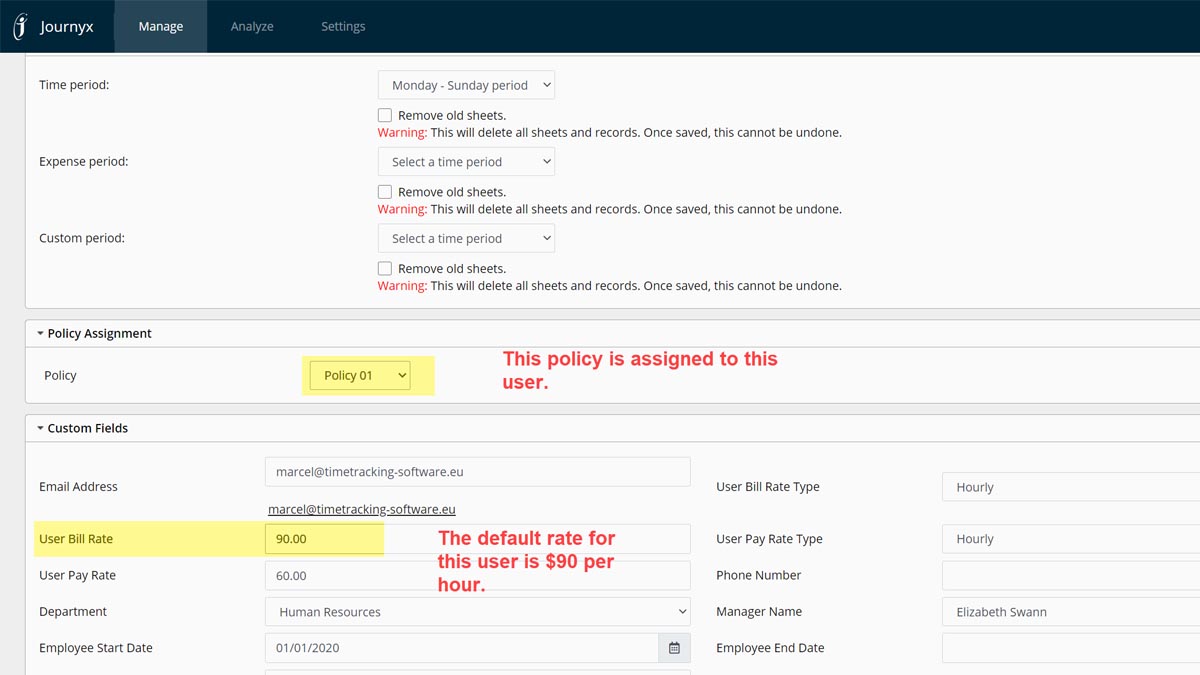
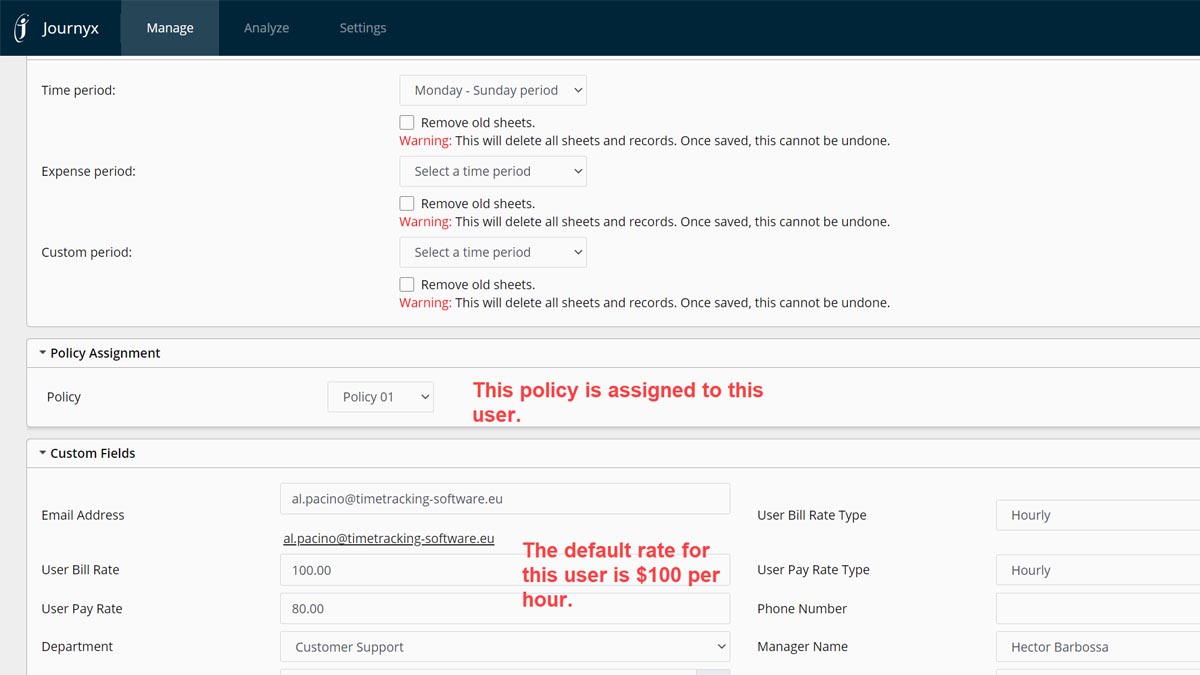
Rates in user record are going to be used by policy
Make sure that the policy is assigned to the user(s).
So far we have defined hourly rates in the user record, set in the policy that the user rates need to be used for calculations and attached the policy to our 2 users, Niro and Pacino. From now on the calculated rates will be stored in the timesheet record when the timesheet is saved. Any timesheet records that were saved before you assigned a policy to the user or added hourly rates somewhere will have no calculated rates. You will need to save the timesheet again so that the system will calculate the rates with the policy.
Note that this also means that you need to re-save the timesheets if you have changed the hourly rates after the timesheet was saved. Otherwise the 'old' calculations will still be used in the rate reports.
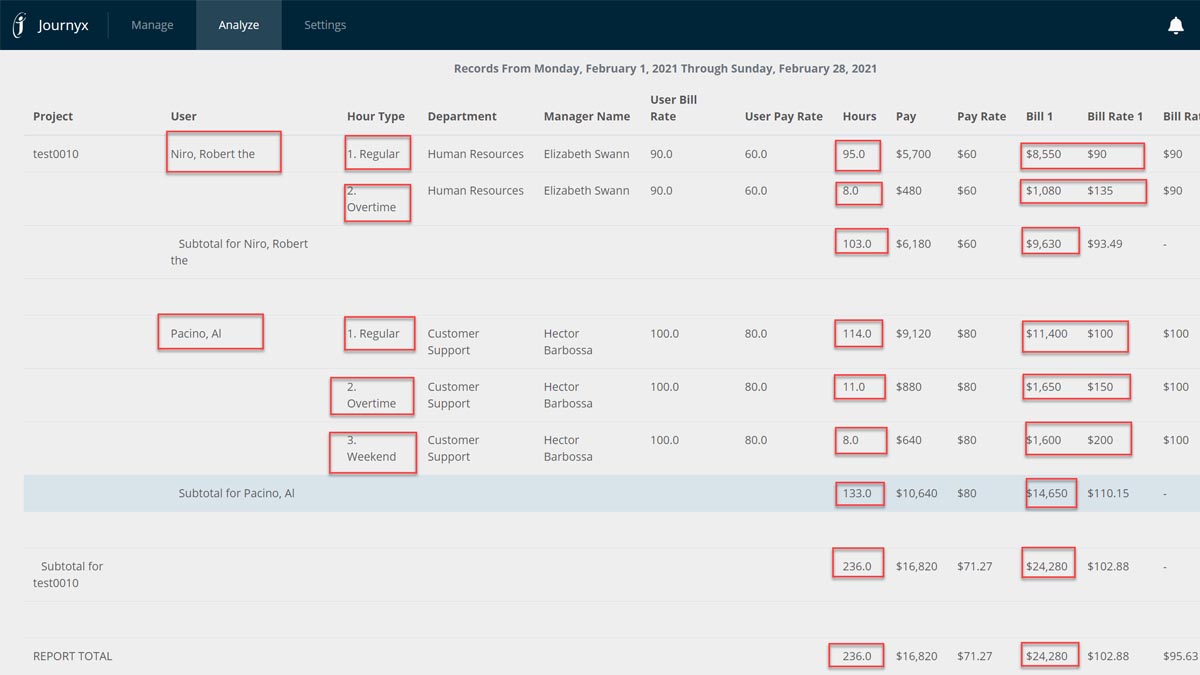
Take closer look at our sample situation. Both users have entered time after the policy and the hourly rates were set. We haven't defined any rules in the policy to change the rates yet. As you can see in the samples below, all calculations are done with the hourly rate defined in the user record. This report was created with Reportlink (rate report).
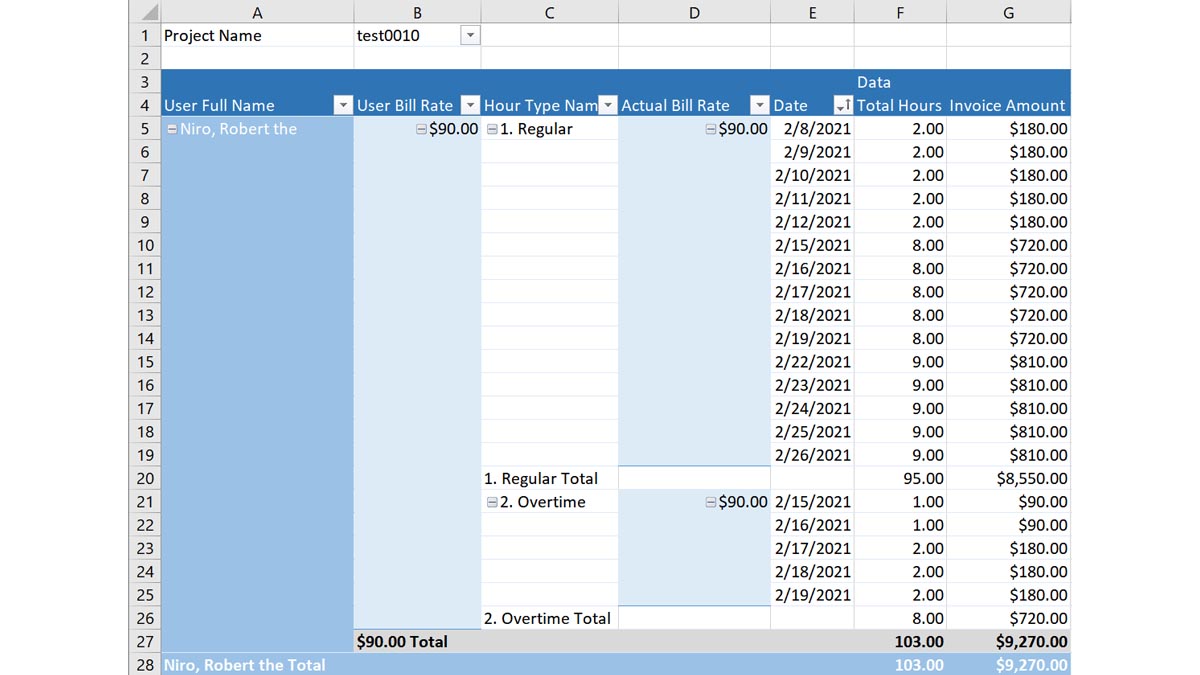
Calculated rates for user Niro
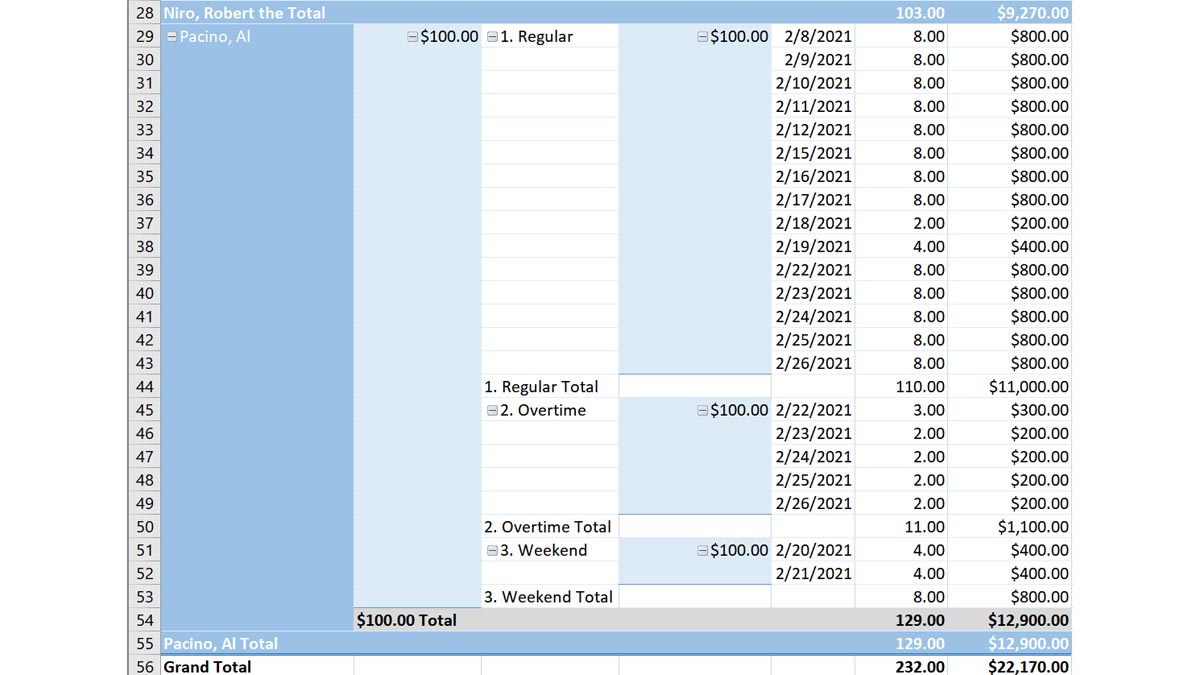
Calculated rates for Pacino
Notice that all the records have the same rate. We are going to change this by adding rules to the policy. Basically a rule is like defining criteria, if this criteria applies then do something with the rate. In this sample we want that hours booked on '2. Overtime' have a different rate: 1.5 * regular rate. We start with defining the rule.
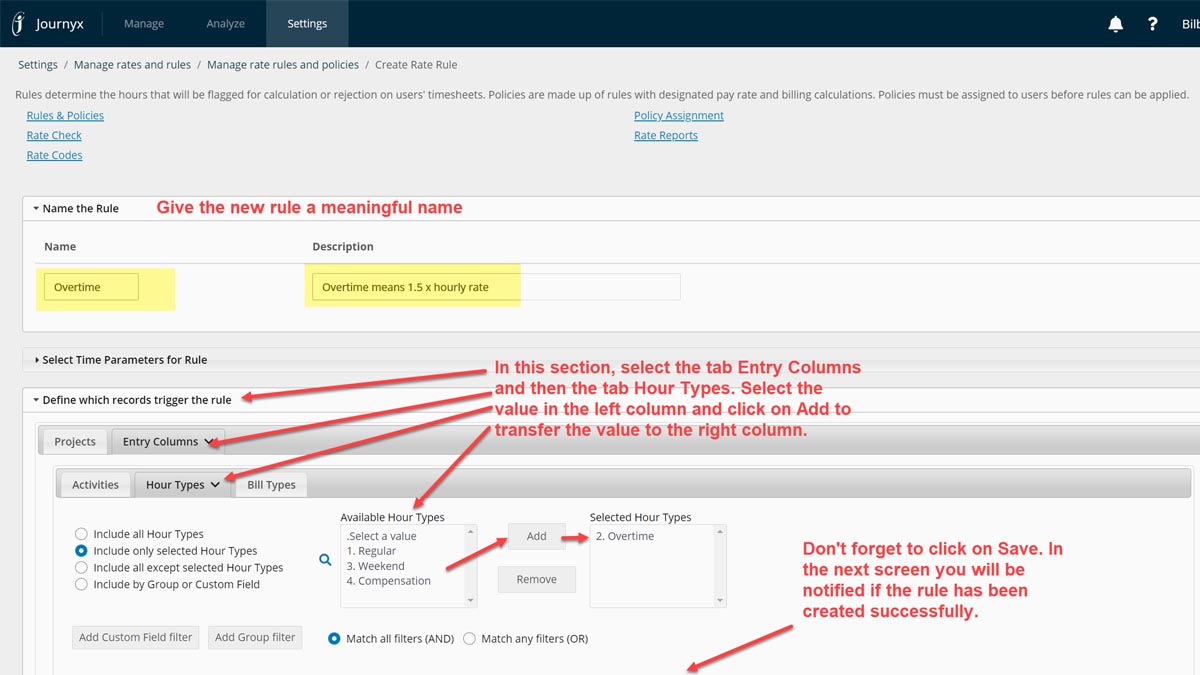
Overtime = 1.5 * regular rate
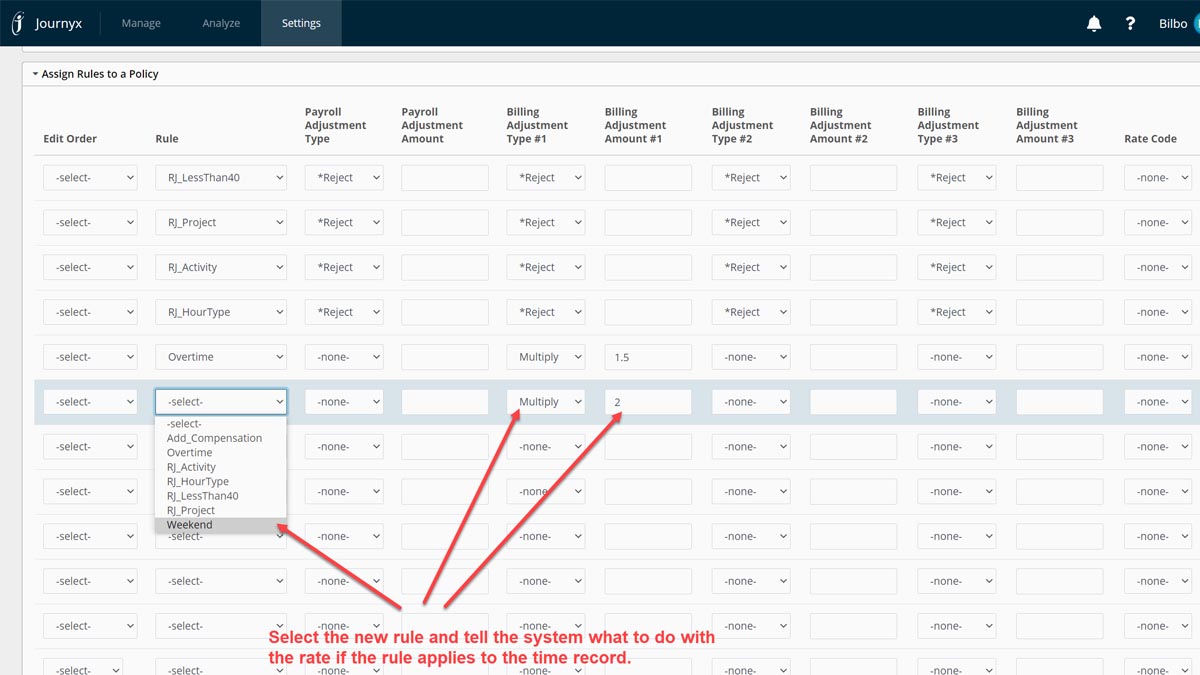
Next step will be to add the new rule to the policy and tell the system to use this rule to change the rate.
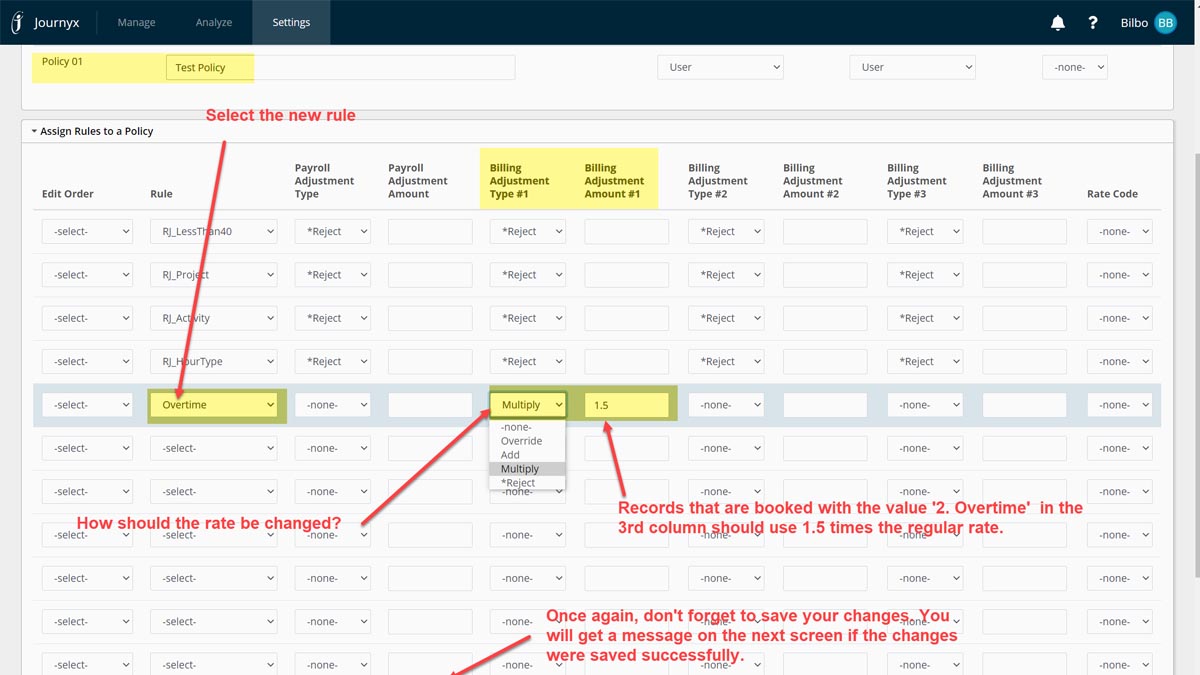
Add new rule to policy
If you look at the time records of user Niro, you see that he as 8 hours registered on '2. Overtime'. these records should use the new rate. If you just refresh your report after changing the policy, you will see that the rates are not changed. You need to save the timesheet again so that the system will calculate the rates again. In our sample, the timesheet was saved once more and you see that the new rates has been used.

Rates are calculated again after saving timerecord
Let's add a rule for the time records with 'Weekend' hours. The rate should be doubled when the user works in the weekend.
Change the rate for the hour type 'Weekend'
Add the new rule to the policy.
Add new rule to policy
Save the timesheets again to recalculate the rates (in our sample only the user Pacino has 'Overtime' and 'Weekend' hours) so we save the sheets with these values again. The result is that the rates are calculated again with the correct changes.
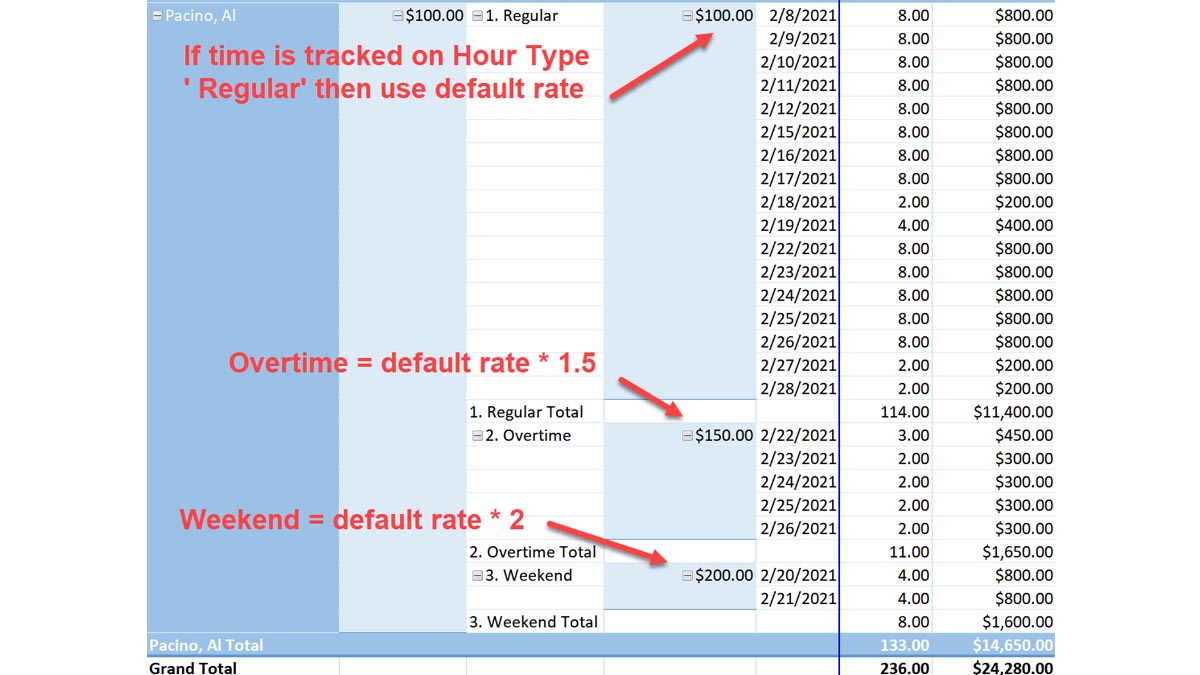
Results after adding 2 rate rules
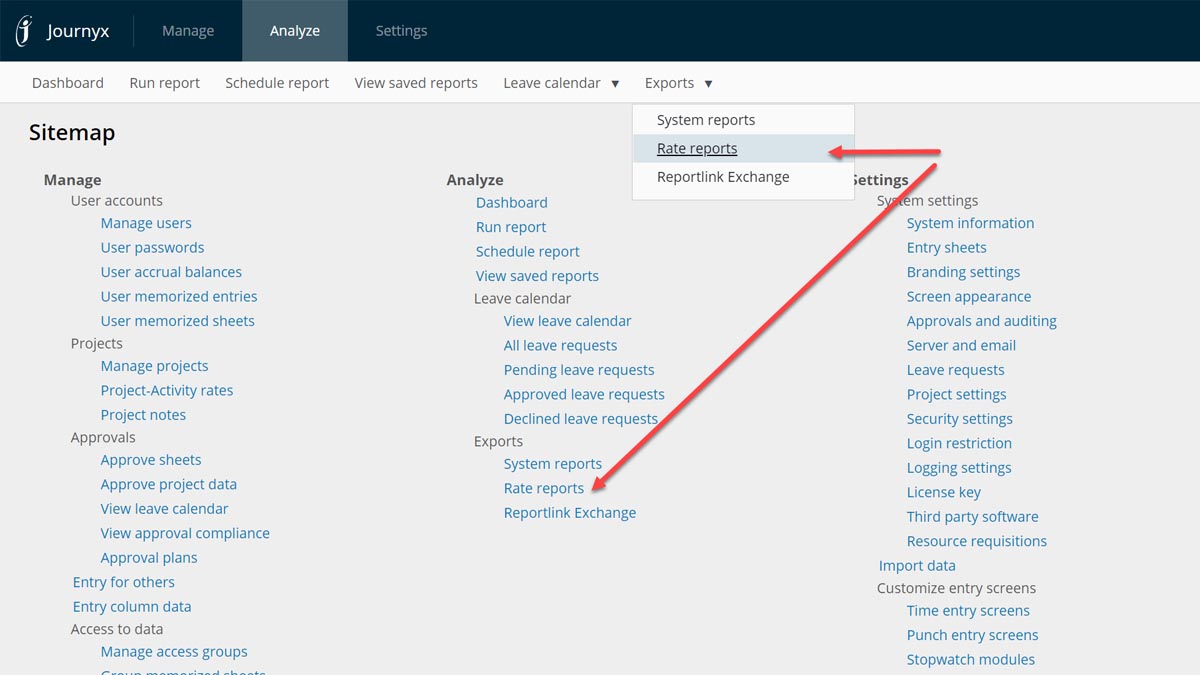
Rate reports can be found: Analyze --> Exports --> Rate reports
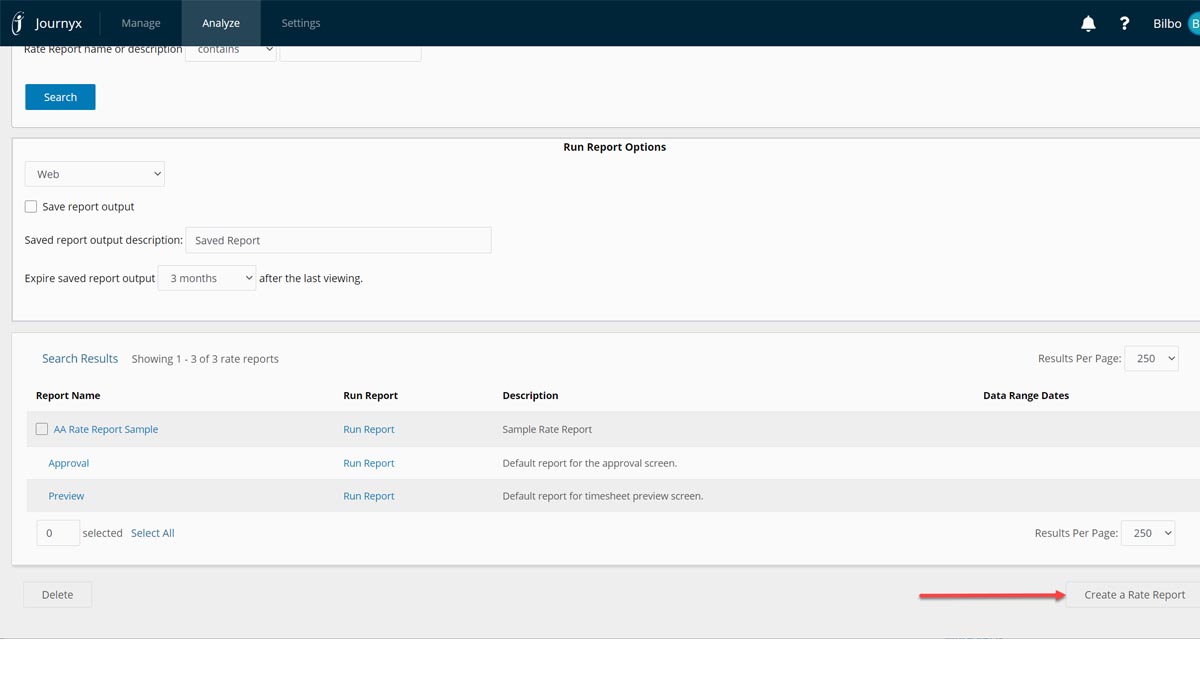
Click on the Create button to create a new rate report.
To show the same data on the standard rate report as in the Excel examples above, we set the following paramaters in the report:
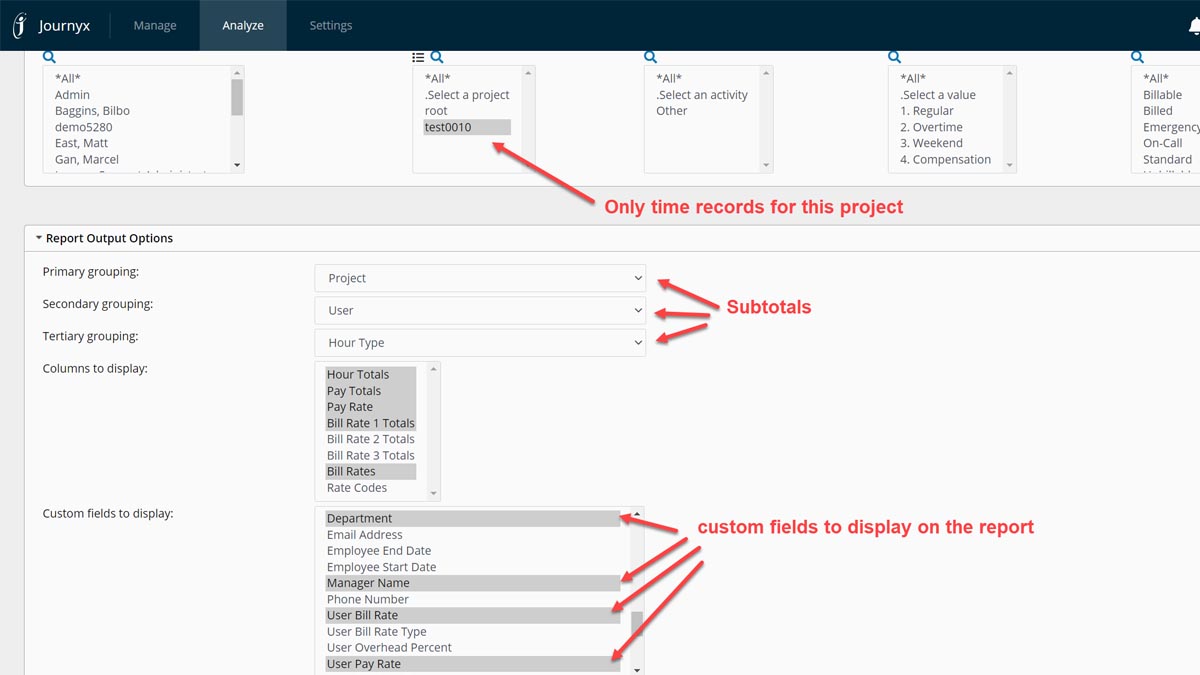
Defining a new rate report
When we run the report we see the same information as in our Reportlink Excel sheets:
Results of the newly created rate report
Added the same 2 custom fields to our Reportlink Excel sheet:
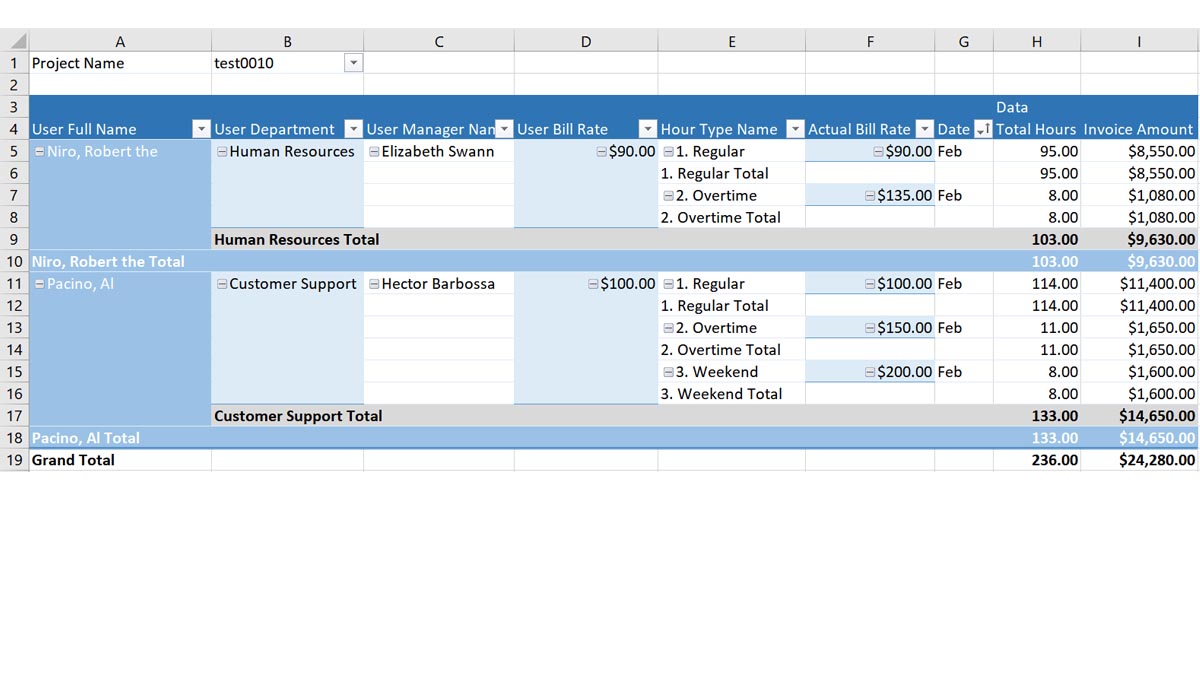
Results of the Reportlink Excel rate report